Setting up a mobile home is the moment where your dream floor plan becomes a real, livable home. It is also where most surprises happen, like soil issues, utility delays, missed inspections, or a delivery path that is tighter than it looked on Google Maps.
This guide walks you through the full process, from site prep to the final walkthrough, with a practical San Antonio and South Texas lens. You will know what to schedule, what to verify, and what to document so your move in goes smoothly.
Before you start: Know what “setup” includes (and what it does not)
“Setting up a mobile home” usually includes much more than placing the home on the lot. In most projects, you will deal with:
- Site feasibility (access, grading, drainage)
- Permits and approvals (city, county, community rules)
- Utility planning (electric, water, sewer or septic)
- Delivery logistics (route, staging area, cranes if needed)
- Installation (support system, anchoring, leveling, marriage line finish for multi section homes)
- Post set finish (steps, skirting, exterior connections)
- Inspections and final walkthrough
Your purchase contract and installer scope will define exactly what is included. If anything is unclear, get it in writing before work begins.
If you want background on home types, financing, and local buying considerations, Homes2Go San Antonio also has a broader buyer guide you can reference: Manufactured Homes San Antonio Options, Prices & Tips.
A realistic setup timeline (what happens when)
Timelines vary based on land conditions, permitting speed, and utility availability. The table below shows a common sequence for the San Antonio area.
| Phase | Typical duration | Main dependencies | Who usually leads |
|---|---|---|---|
| Site evaluation and budgeting | 1 to 7 days | Property access, basic utility research | Buyer, retailer, site contractor |
| Permits and approvals | 1 to 6+ weeks | Jurisdiction rules, drawings, installer info | Buyer or contractor (varies) |
| Site prep (clearing, grading, pad, access) | 2 to 10 days | Permits (sometimes), weather, equipment access | Site contractor |
| Utility prep (trenching, meter base, septic, water line) | 3 days to 3+ weeks | Utility provider scheduling, inspections | Licensed trades, utility providers |
| Delivery and set | 1 to 3 days | Pad ready, access clear, installer scheduled | Transport + licensed installer |
| Tie downs, finish, skirting, steps | 2 to 14 days | Materials, inspections, weather | Installer, finish crews |
| Final inspections and walkthrough | 1 to 7 days | All work completed, inspection appointments | Buyer, installer, AHJ |
“AHJ” means Authority Having Jurisdiction, the city, county, or community that enforces permits and inspections.
Step 1: Confirm the site is actually buildable for a manufactured home
Before anyone schedules delivery, confirm the lot can legally and physically accept a manufactured home.
Zoning, deed restrictions, and community rules
- If you are placing the home on private land, verify zoning and any deed restrictions.
- If you are placing the home in a land lease community, ask for written community requirements (home age limits, skirting rules, roof pitch, parking, pets, sheds, and so on).
Texas manufactured housing is regulated statewide, and installation and licensing are commonly handled through the Texas Department of Housing and Community Affairs manufactured housing program. Start here for official references: TDHCA Manufactured Housing.
Flood risk and drainage reality
Even a “flat” South Texas lot can hold water after a heavy storm if drainage is not planned.
- Check FEMA flood maps using the official tool: FEMA Flood Maps.
- Walk the lot after rain if possible, or ask neighbors where water ponds.
If a site sits low relative to surrounding properties, plan for grading and drainage early, not after delivery.
Utility availability (do not assume)
Confirm what is actually at the property line:
- Electric service type and distance to connection
- Water source (city, co op, well)
- Sewer availability (city sewer or septic)
Septic is common outside dense areas, and it affects both budget and schedule because it requires design, permitting, and inspections.
Step 2: Get your permits and approvals lined up
Permitting is local. Requirements differ between the City of San Antonio, Bexar County, and surrounding counties, and they can differ again in incorporated areas.
At a minimum, expect to coordinate:
- Installation standards and installer licensing
- Electrical permit for service and hookups
- Plumbing permit for water and sewer connections
- Septic permits and inspections (if applicable)
For national installation standards context, HUD maintains manufactured housing program information here: HUD Manufactured Housing Program.
Practical tip: Ask your installer what inspections are required before delivery versus after set. Some jurisdictions want the pad or support system inspected before the home arrives.
Step 3: Site prep (the work that prevents expensive problems later)
Site prep is where long term performance starts. A manufactured home can look perfect on day one and still develop door alignment issues, drywall cracks, or moisture problems later if the base is not right.
Core site prep tasks
Your contractor may include some or all of the following.
| Site prep item | Why it matters | Common “missed detail” |
|---|---|---|
| Clearing and demolition | Removes obstructions and old structures | Not removing old concrete that blocks runners or piers |
| Grading and leveling | Reduces settlement risk, improves drainage | A pad that is level but still holds water |
| Base or pad preparation | Provides stable support for the home | Soft spots from uncompacted soil |
| Driveway and access | Enables transport and service access | Turns too tight for a long trailer |
| Drainage planning | Protects skirting area and supports | Downspouts dumping right at the foundation area |
Plan your delivery path like a professional
Walk the route from the main road to the exact set location.
- Measure gates, turns, and overhead clearance (trees, lines)
- Identify soft ground areas that will rut under heavy equipment
- Confirm there is a staging area for the sections and installer tools
If you are buying a home to place in a prepared community, ask what is already included. For example, Homes2Go highlights a local land option with utilities and base pads already prepped at their Elmendorf area community page: Property lots and community details.
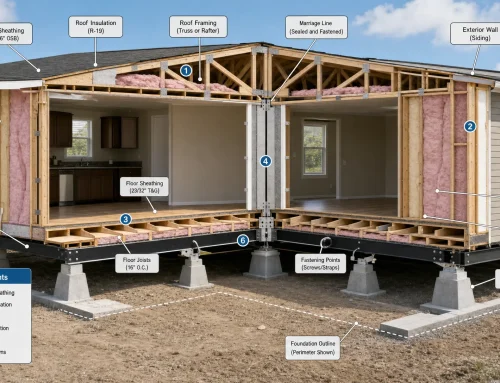
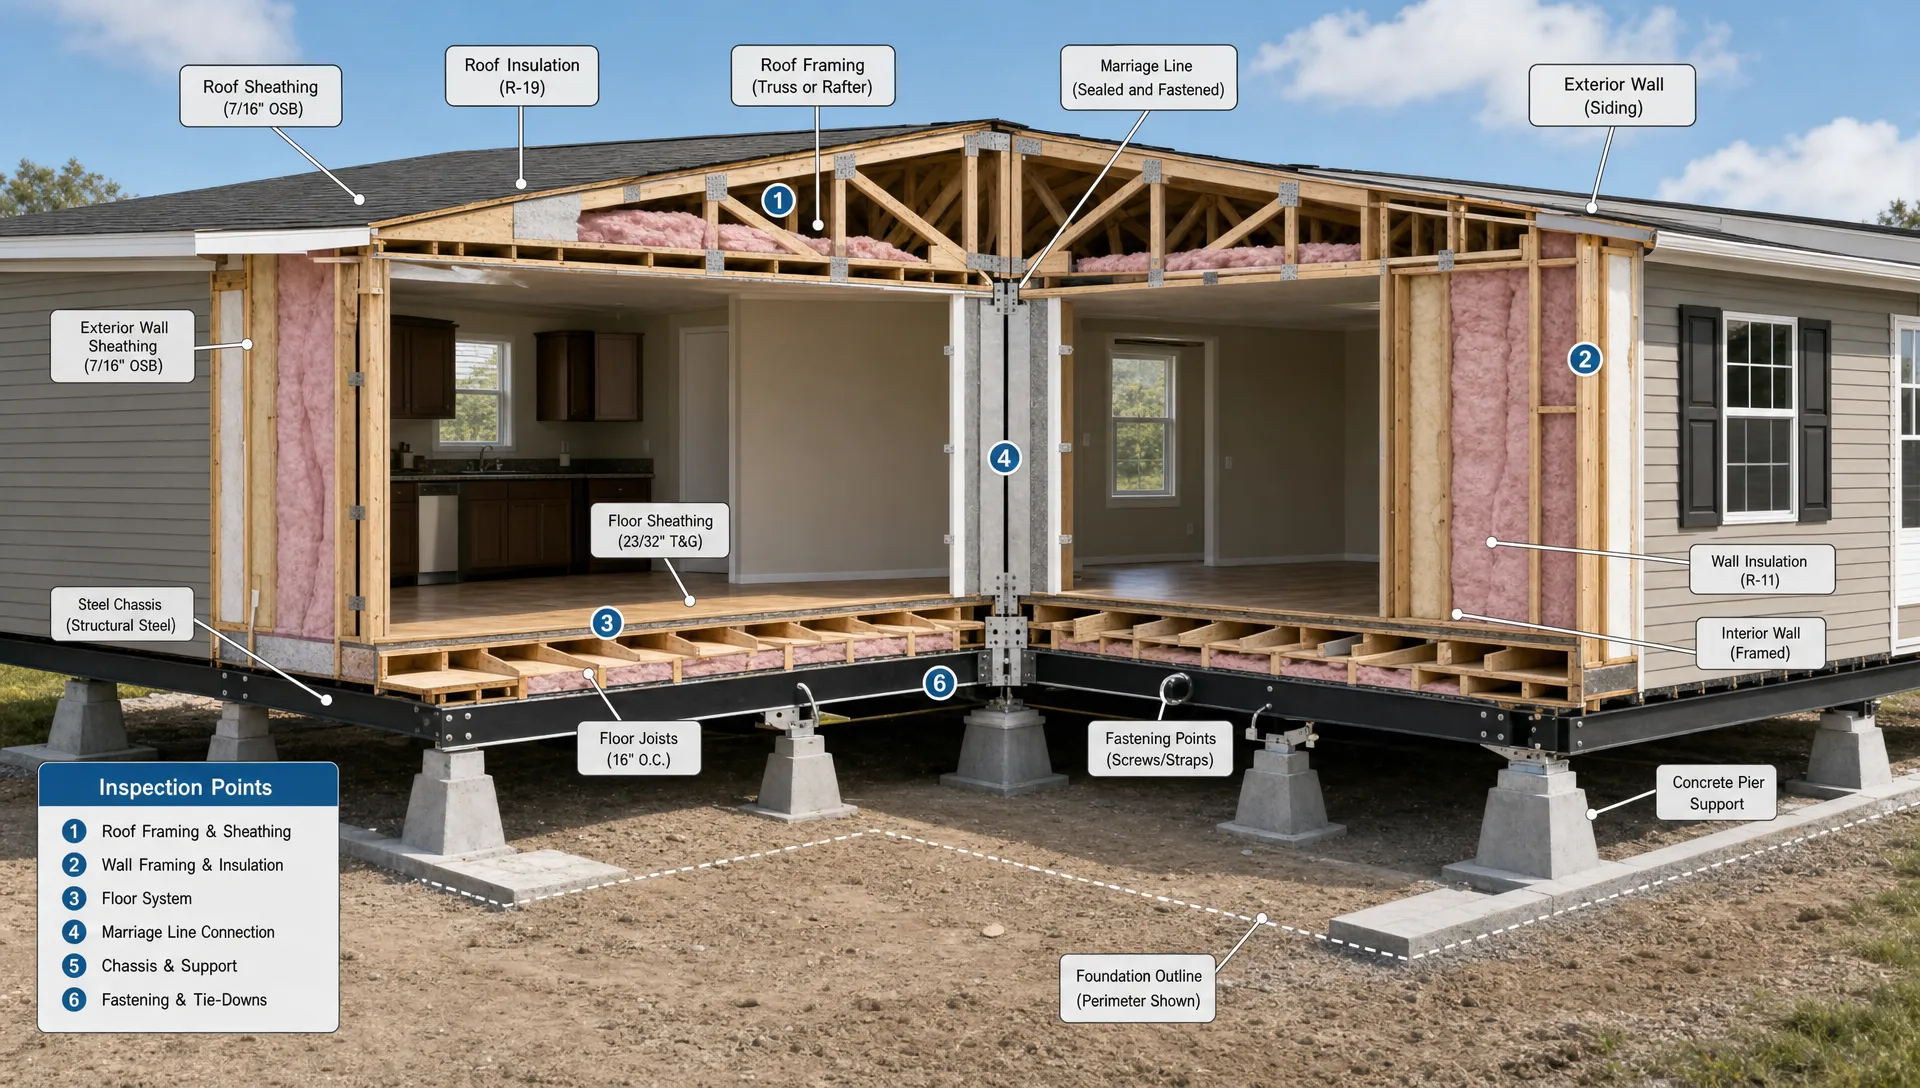
Step 4: The support system, anchoring, and leveling (do not treat this as “just blocking”)
Manufactured home installation typically uses an engineered support approach (often a pier and beam style system) and anchoring (tie downs) to resist wind forces.
Key points to verify with your installer:
- The support design matches your home and site conditions
- Pier spacing and materials meet the required installation manual
- Anchors are installed to the correct depth and torque
- Leveling is done carefully and rechecked after initial settling
Your home will also have documentation (such as an installation manual and a data plate) that indicate compliance and may reference wind and thermal zones. If something does not match local requirements, solve it before delivery.
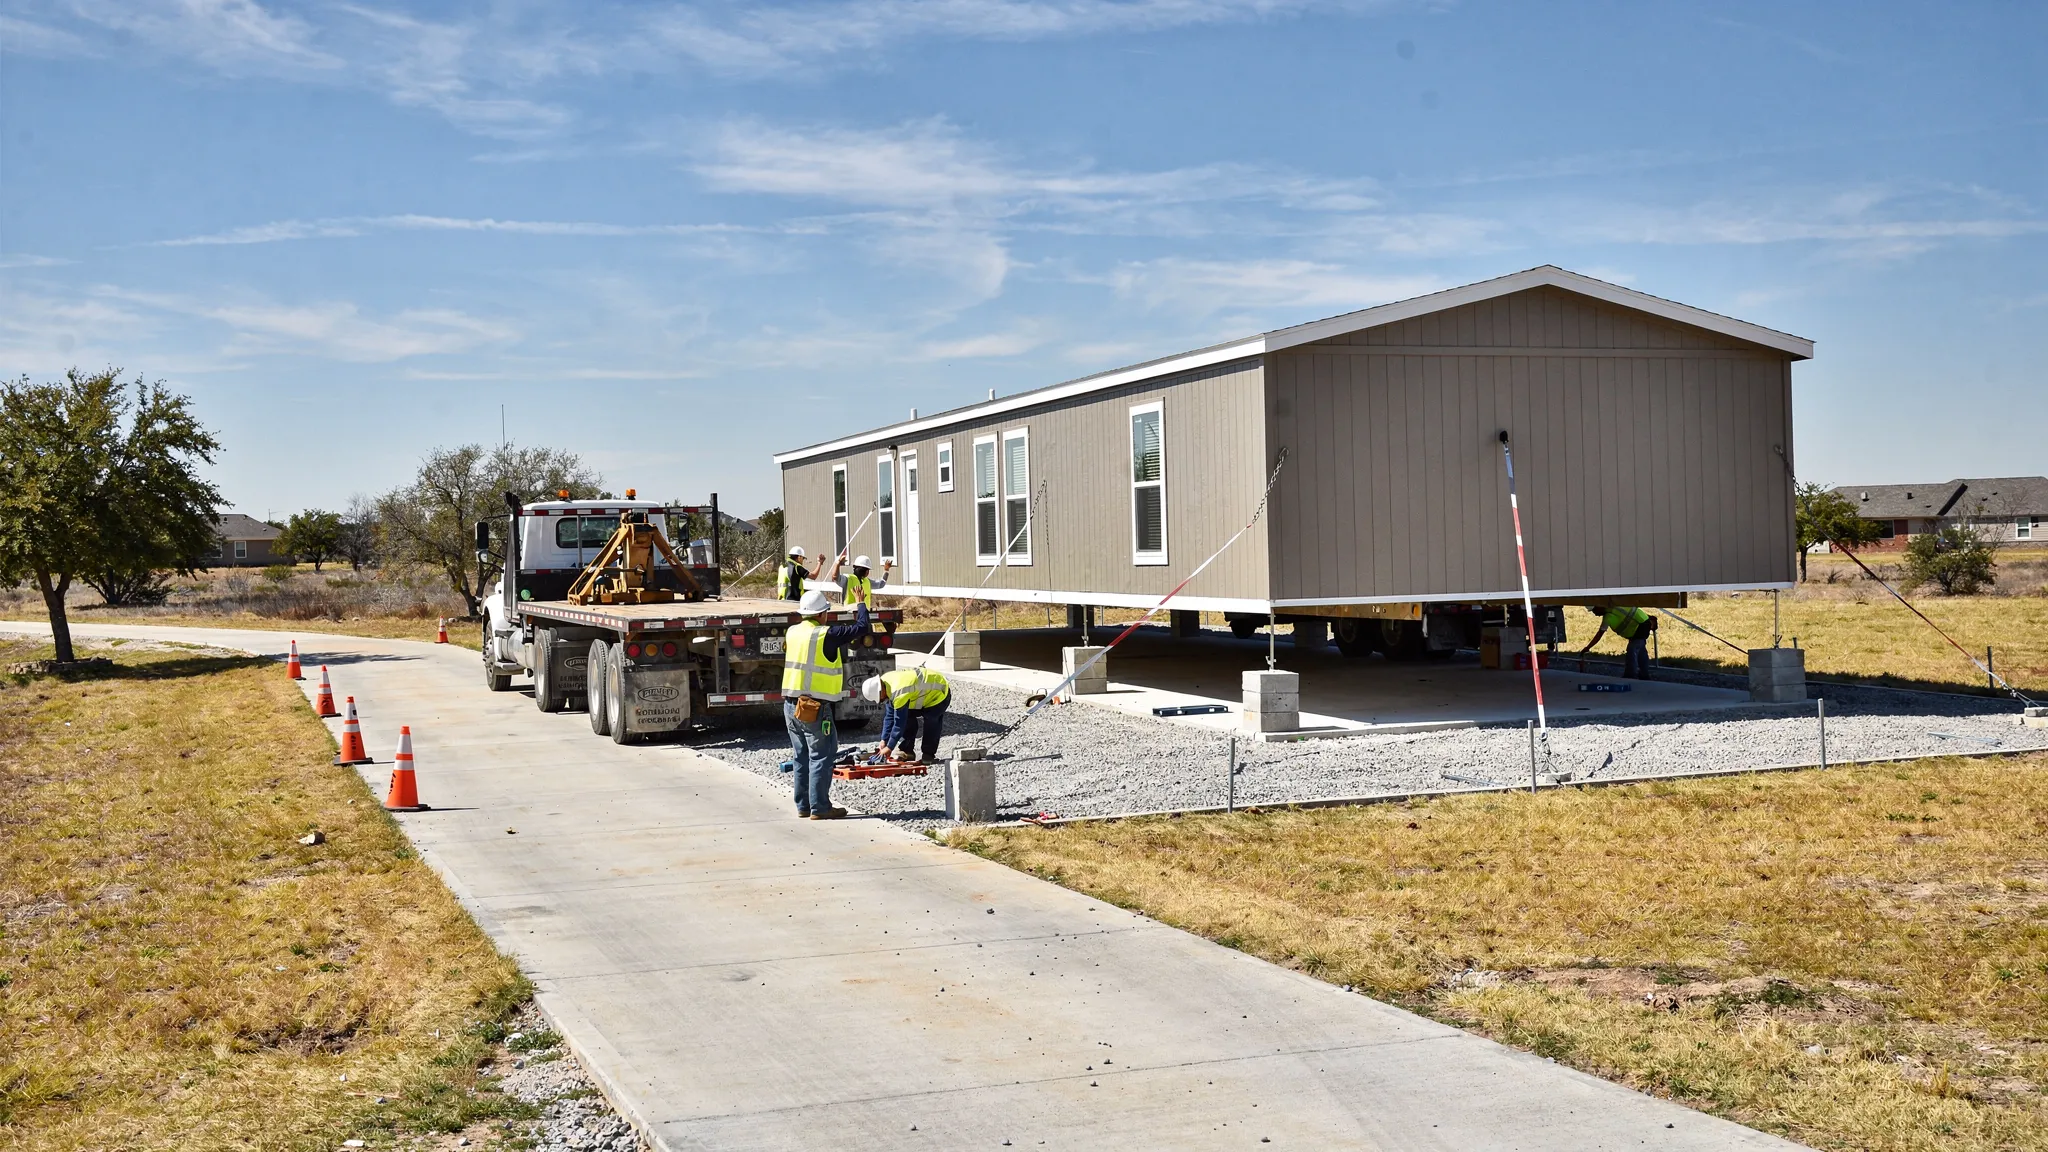
Step 5: Delivery day and set (what you should watch for)
Delivery is the most visible part of setting up a mobile home, and it is also where minor mistakes can cause major delays.
What good delivery coordination looks like
- The pad is finished and accessible before the trucks arrive
- Utility trenches are either complete or clearly planned so equipment is not blocked
- The installer has enough room to work safely
- The sections are placed without scraping siding, windows, or roofing
Multi section homes: marriage line basics
If you are installing a double wide or larger home, the marriage line is where the sections join.
You want tight alignment and proper sealing. Ask how the crew will handle:
- Weather sealing at the seam
- Interior finish alignment (trim, flooring transitions)
- Any roof cap details if applicable
Take photos at key moments (especially before areas are covered) so you have documentation if a question comes up later.
Step 6: Utility hookups (schedule these early)
Utility delays are one of the most common reasons move in dates slip. Some providers and inspectors book out weeks in advance.
Electrical
Electrical work typically includes a meter base, service disconnect, grounding, and connection to the home.
Safety note: Only licensed professionals should perform electrical work. Your installer and electrician should coordinate so the service location aligns with the home’s connection point.
Water and sewer (or septic)
- Water line depth and insulation matter in extreme weather
- Sewer slope and venting must be correct to avoid backups and odors
If your project uses septic, treat it as its own mini project with permitting, install, and inspections.
Step 7: Finish work that affects comfort, durability, and insurance
Once the home is set and connected, the remaining items determine how it lives day to day.
Skirting and ventilation
Skirting is not just cosmetic. It protects plumbing and helps control moisture and pests.
Ask your installer:
- What skirting material is included
- How access panels will be handled
- How ventilation will be provided (where required)
Steps, landings, and handrails
Entry safety is a big deal, especially for families with kids or older adults.
Confirm:
- Step height and landing size
- Handrail requirements
- Door swing clearance
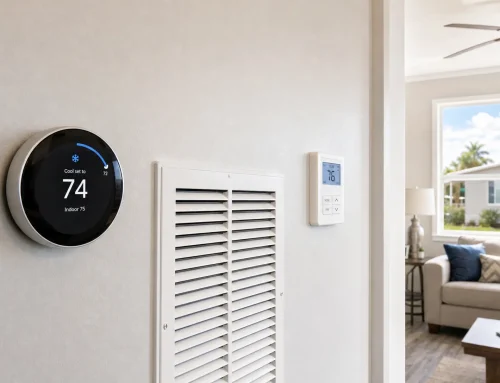
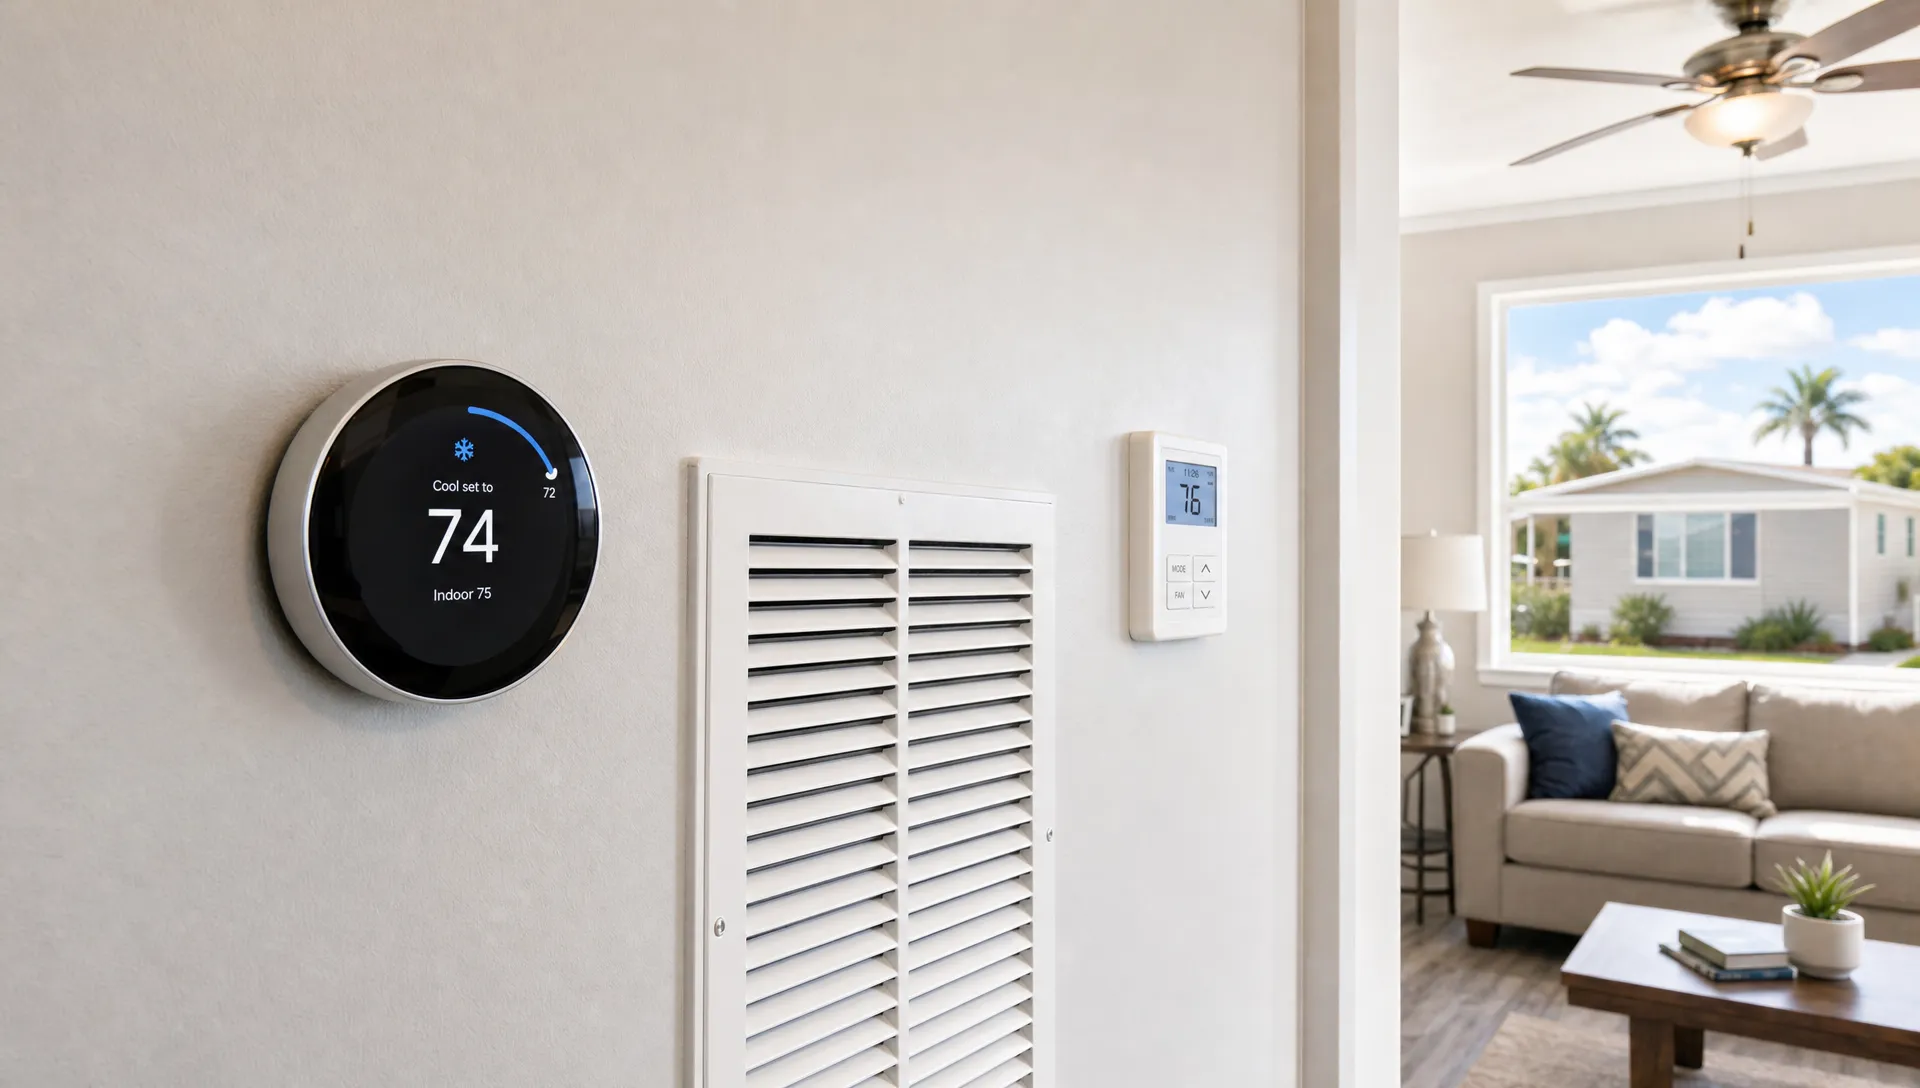
HVAC startup and airflow checks
In South Texas heat, comfort depends on correct setup.
- Confirm the thermostat works as expected
- Make sure supply registers are open and balanced
- Ask about any recommended filter type and change intervals
If you are prioritizing lower bills and better comfort, you can also reference Homes2Go’s guide on efficiency features that matter in Texas: Energy Efficient Manufactured Homes.
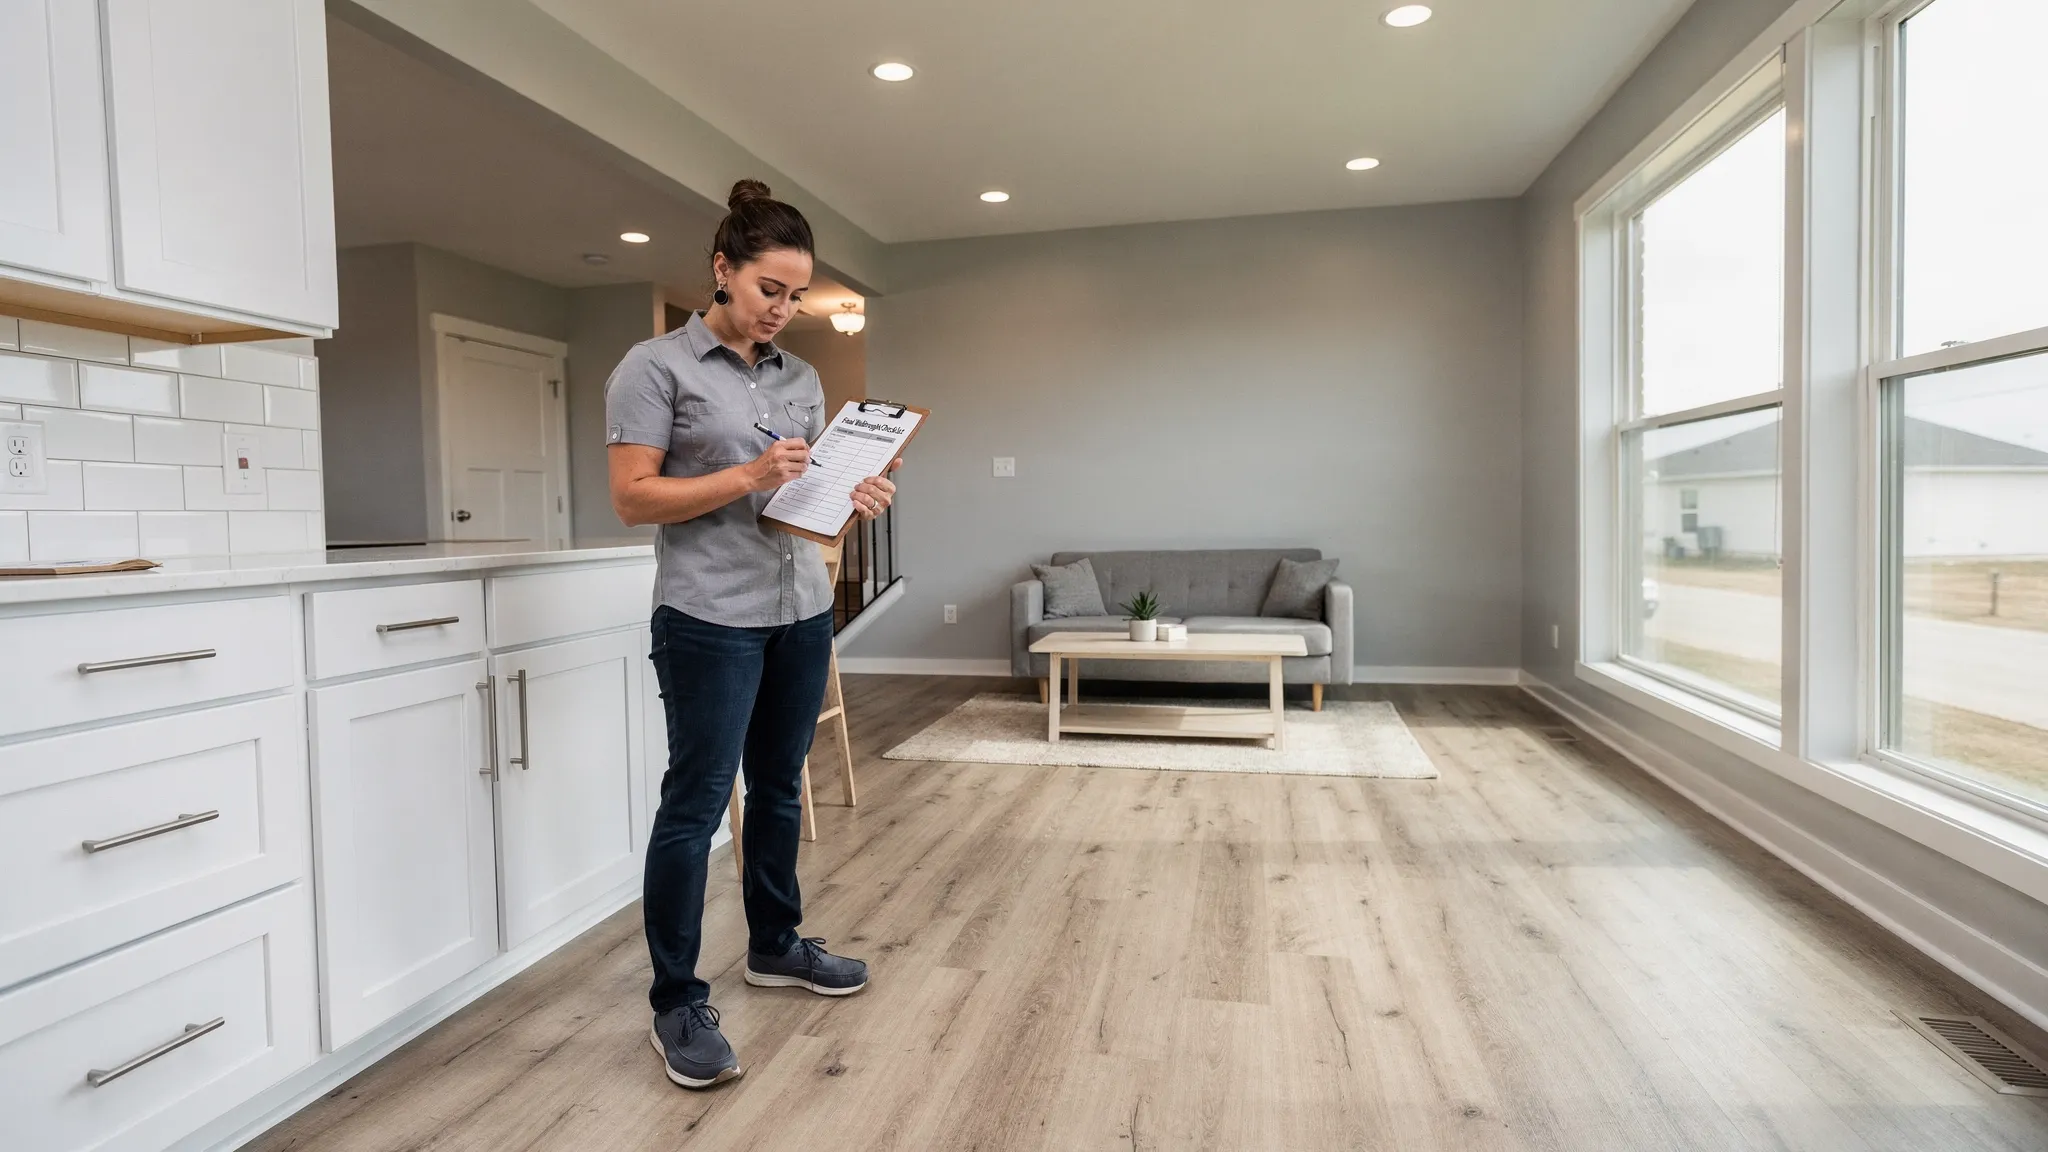
Step 8: Inspections, punch list, and the final walkthrough
This is where you protect yourself. Do not rush the walkthrough because you are eager to move in.
What to bring to your walkthrough
- Your contract scope (what was included)
- Any change orders
- A phone for photos and video
- Painter’s tape to mark items
- A notebook (or a shared checklist app)
Walkthrough checklist (room by room, then systems)
Start inside, then move outside. Look for:
- Doors and windows: open, close, latch, lock
- Floors: soft spots, squeaks, uneven transitions
- Walls and ceilings: visible gaps, nail pops, stains
- Cabinets and counters: alignment, loose hardware, caulk gaps
- Plumbing: leaks under sinks, water pressure, hot water time
- Electrical: GFCI function in kitchen, baths, exterior outlets
- HVAC: heating and cooling cycles start and stop normally
- Appliances (if included): model numbers, basic operation
- Exterior: siding damage, roof penetrations sealed, skirting secure
Document the punch list the right way
A good punch list is specific and trackable.
Instead of “door sticks,” write “primary bedroom door rubs at top hinge side, does not latch without force.” Add a photo.
Ask:
- Who is responsible for each item (installer, manufacturer warranty, retailer)
- The expected timeline for completion
- Whether re inspection is required after corrections
Get your closeout documents
Before you consider the project complete, request copies of:
- Permit finals and inspection sign offs (as applicable)
- Installer documentation and any certification stickers or forms required
- Warranty documents and service contacts
- Utility account confirmations and meter numbers
If you financed your home, your lender may also require specific completion documents. Homes2Go provides an overview of common financing paths here: Manufactured home financing options.
Step 9: Your first 30 to 90 days after setup (when small issues show up)
Even with a perfect install, a home can settle slightly. That is normal. What matters is catching issues early.
In the first few months:
- Watch for new door misalignment or sticking
- Check under sinks and behind toilets for slow leaks
- Confirm skirting vents and access points remain secure
- Replace HVAC filters on schedule
- Keep water draining away from the home (especially after storms)
If you see moisture under the home or standing water around the perimeter, address drainage immediately. Moisture is one of the fastest ways to turn a small issue into an expensive repair.
When to use a professional project coordinator
If your setup involves septic, long utility runs, significant grading, or tight access, the project becomes more like a small construction job.
Consider professional coordination when:
- Multiple permits are required across different offices
- Utility providers have long lead times
- The property needs extensive clearing or a new driveway
- You are placing the home on rural land and managing contractors yourself
Homes2Go San Antonio works with buyers through the selection and purchasing process and can provide expert guidance as you plan for placement and move in. If you want help mapping out your next steps, start by exploring available homes and reaching out through their site: Homes2Go San Antonio.
Frequently Asked Questions
How long does it take to set up a mobile home from site prep to move in? Many projects take several weeks end to end. Site prep and utility scheduling often take longer than the delivery and set, especially if permits or septic are involved.
What is the biggest mistake people make when setting up a mobile home? Underestimating site prep and utilities. A beautiful home can still have long term issues if drainage, compaction, and proper connections are not handled correctly.
Do I need permits to set up a manufactured home in the San Antonio area? In most cases, yes. Permits and inspections depend on the jurisdiction and the work performed (installation, electrical, plumbing, septic). Check with your local Authority Having Jurisdiction and use licensed professionals.
What should I look for during the final walkthrough? Focus on function and safety: doors and windows, flooring feel, plumbing leaks, GFCI outlets, HVAC operation, exterior sealing, and any visible damage from delivery.
Who fixes punch list items after setup? It depends on the issue. Installation items are typically handled by the installer, while product defects may be handled through the manufacturer warranty process. Get responsibilities in writing.
Ready to plan your mobile home setup in San Antonio?
If you are shopping for a home and want help thinking through placement, access, communities, and financing, Homes2Go San Antonio can guide you from selection to move in readiness. Browse available options and request details at homes2gosa.com.
 Clayton Homes Warranty: What’s Covered and What’s Not
 Mobile Homes: New vs Used, Costs, and Buying Mistakes
